|
|
|
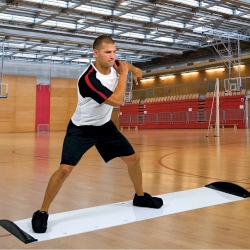
A slide board is
a slick mat with blocks on each side so you can stop and push off
with your feet. Cotton booties are placed on your feet or hands to
allow movement across the board. Slide boards have been used by
hockey players, speed skaters and various athletes for decades.
Physical therapists use it to help
patients recovering from ligament injuries or surgeries.
Slide boards are now, however, part of
the mainstream fitness world.
Slide boards are designed to improve strength and
stability in the gluteals, inner thighs and shoulder stabilizers. They can build the
quick, explosive power you need for the court, field, or ice.
Slide board lateral training
can improve power, change of direction, balance, agility, speed,
flexibility and endurance.
It is also a low-impact,
high-intensity workout that can help improve bone density.
They provide a good aerobic
workout that increases the heart rate.
Aside from the standard, lateral skating
motion, that the board is meant for, there are plenty of other
exercises that can be performed on the slide board.
Slide Board Split
Squats can be performed with your bootie covered back foot
on the slide board only.
Your back foot slides backward while the
front knee flexes (bends).
a single-leg exercise that blends
unilateral (single) leg strength with general instability. Split
squats on a slide board recruit most muscles in the lower extremity.
Chest Fly Push ups
Line up perpendicular to the slide
board with one hand on the floor (off the slideboard) and the other
hand on the slide board with a booty on it. Slide your booty
hand out as you go down for a big chest stretch and pull it back in
under your shoulder as you come back up.
|
|
Do It Yourself |
You will pay anywhere from $175 to over
$500 for a store bought slideboard. However, I made 2 of them
for about $50! You will, however, need a circular saw, a caulk
gun, a drill, and some basic knowledge of how to use them.
Here's the materials you will need to make 2 of them (since plywood
typically only comes 4' x 8')...
- 1: 4'x8' sheet of plywood
- 1: 4'x8' sheet of white board (melamine)
- 1: 2x4x8
- 2: caulk tubes of liquid nails
- 8: 3/8 x 3" machine bolts
- 8: 3/8" wingnuts
- carpet remnant (optional)
Directions:
I preferred to make my slideboard 7.5 feet long. If you do,
you will want to first cut 6 inches off the top of the plywood and
melanin sheets.
- Measure and rip both the plywood
and the melamine sheets in half (2 feet)
- Run caulk beads of liquid nails
all around, about an inch from the edge of your plywood pieces.
Use up the rest of a liquid nails tube by running about 3 more
beads lengthwise.
- Fit the melamine piece on top of
the plywood (non-white side down of course).
- Walk all over the white board in
your socks to ensure that you have a tight fit.
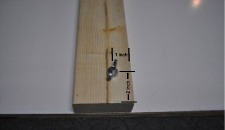
- Cut your 2x4 into 2 foot lengths
- Drill 3/8" holes in the end of
your 2x4 pieces, 2" from the end and about 1" from the side (see
below) This provides more stability on the end blocks once they
are mounted.
- Once the liquid nails have had a
few hours to dry, line up one of your end blocks at the edge of
the board (1" side closest to the middle) and drill holes all the
way through the slideboard, using the holes in the 2x4 as a guide.
- Thread the machine bolts up from
the bottom and secure tightly in place with the wingnuts.
- Repeat this step on the other
side.
- In order to make the slide
distance adjustable, remove one of your end pieces, measure and
drill 2 or 3 sets of holes every 6 inches. This will allow
you to move one of your end blocks and allow people of different
levels to use it.
- You can use a sander to clean up
the edges of your slideboard as you see fit.
- Spray your slideboard with
furniture polish or armorall to make it more slippery.
- A friend of mine picked me up a
pair of paper booties from the hospital, but you can find them on
eBay also under "medical shoe covers". $20 for a pair of
booties at a fitness store, or about $25 for a roll of 50 pairs of
"medical shoe covers". : )
Start sliding... Enjoy!
ref. LiveSTRONG.com
ref. ehow.com
|
|
|
|